

One Room Challenge Laundry/Mudroom/Office: Sources
First, thank y'all SO much for all the love, comments, Instagram likes, etc. regarding our One Room Challenge. We poured a lot of love, sweat, and even a few tears into this project, and we love it. It makes it even more fun to know that y'all like it too. We truly appreciate the support!
I wanted to do a quick rundown of the sources for most everything we used. The main credit goes to my awesome hubby who not only did almost all of the physical labor, but even enjoyed it! Maybe he will become the next Chip Gaines; he's sure goofy enough to fit the part. ;)
Please excuse some repeat photos. I just don't have the energy to take new ones and edit. :)


Walls: Benjamin Moore White Dove
Beadboard and stencil: Sherwin Williams Urbane Bronze
Stencil: Sari Paisley Allover Stencil from Cutting Edge Stencils
Boxwood wreath: Smith and Hawken at Target
Beadboard: Sherwin Williams Urbane Bronze
Hooks: oil rubbed bronze, Home Depot
Artwork: local antique store


Chalkboard Wall: Sherwin Williams Urbane Bronze, coated with Martha Stewart Crafts Multi- Surface Chalkboard Acrylic in Clear
Trim: Benjamin Moore White Dove
Beadboard: Sherwin Williams Urbane Bronze
Brass Sconce: Ethan wall sconce, World Market
Table Lamp: Pottery Barn (purchased many years ago)
Floating Desk with roll-out keyboard: Built by us (really, my hubby), finished in
Benjamin Moore Chelsea Gray
Cubby: Target
Metal Trash Can under desk: Ballard Designs
Chair: Ballard Designs
Chair Pad: Ballard Designs
Striped Day Planner: Whitney English's Day Designer at Target
Jesus and Coffee Mug: Creations by Courtney
I wanted to do a quick rundown of the sources for most everything we used. The main credit goes to my awesome hubby who not only did almost all of the physical labor, but even enjoyed it! Maybe he will become the next Chip Gaines; he's sure goofy enough to fit the part. ;)
Please excuse some repeat photos. I just don't have the energy to take new ones and edit. :)


Accordion Drying Rack: Better Homes & Gardens, purchased via Amazon
Metal B: Hobby Lobby
Focus on the Good Canvas: TJ Maxx
Wall Mount Sink: Mustee Laundry Tub, purchased via Amazon
Faucet: Ikea (purchased many years ago)
Boxwood: Smith & Hawken at Target
Cabinet Pulls: oil rubbed bronze from Home Depot
Rug: HomeGoods
Apron: Anthropologie
Light: Hampton Bay oil rubbed bronze vintage flushmount Home Depot (excuse the grainy iPhone photo)
Walls: Benjamin Moore White Dove
Beadboard and stencil: Sherwin Williams Urbane Bronze
Stencil: Sari Paisley Allover Stencil from Cutting Edge Stencils
Boxwood wreath: Smith and Hawken at Target
Beadboard: Sherwin Williams Urbane Bronze
Hooks: oil rubbed bronze, Home Depot
Artwork: local antique store
Bulletin Board: HomeGoods (purchased many years ago)
Rug: HomeGoods
State of Georgia Chalkboard: local gift store
Brass Pendant Light: HomeGoods
Chalkboard Wall: Sherwin Williams Urbane Bronze, coated with Martha Stewart Crafts Multi- Surface Chalkboard Acrylic in Clear
Trim: Benjamin Moore White Dove
Beadboard: Sherwin Williams Urbane Bronze
Brass Sconce: Ethan wall sconce, World Market
Table Lamp: Pottery Barn (purchased many years ago)
Floating Desk with roll-out keyboard: Built by us (really, my hubby), finished in
Benjamin Moore Chelsea Gray
Cubby: Target
Metal Trash Can under desk: Ballard Designs
Chair: Ballard Designs
Chair Pad: Ballard Designs
Striped Day Planner: Whitney English's Day Designer at Target
Jesus and Coffee Mug: Creations by Courtney
ORC Week 6: We Made It! (Literally & Figuratively)
Well, we made it to the end of our first One Room Challenge, and I am SO glad we did it. It was exhausting: 2 am has become our new normal bedtime. And it was a tad stressful at times. But, we worked hard as a team, and I am so proud of my husband and the skills he honed along the way. I'm also proud of us for setting a goal and sticking to it. We tend to meander our way through projects around here (I'm looking at you, uncaulked & unpainted crown molding installed 6 months ago in our daughter's room). It's amazing how much you can accomplish when you don't binge watch a show on Netflix.
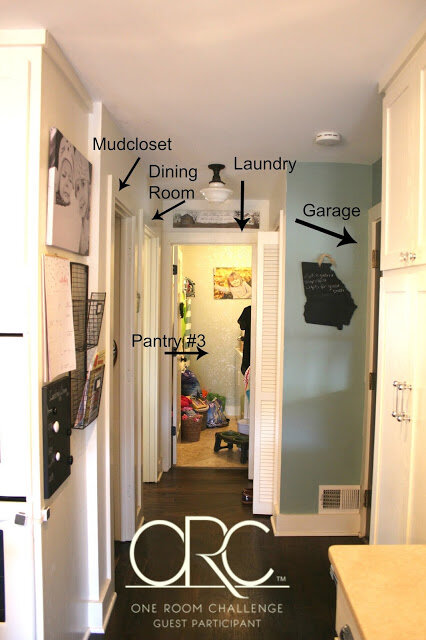
For those dropping in for the first time, we committed to making over our laundry room, mudcloset, & garage entry, and we turned a pantry into an office nook in the kitchen hallway. You can see our intro here, design plan here, and play catch up here, here, and here. Linda of Calling It Home created this wonderful blog program, a 6 week exercise in design (& a little insanity). It was so fun, and we've already come up with ideas for at least 3 other rooms. I'm not sure we will participate in 3 more ORCs consecutively as budget does play a huge factor in timeliness. But, I am sure we will do this again, and hopefully soon. Ok, enough talking. On with the pictures.
As a reminder, here is a before shot of the laundry room.

It wasn't bad; in fact, most people who visit our home comment on how much they loved the laundry room walls. But, it just wasn't for me. I spend a lot of my day in the kitchen, which has a direct view of the laundry room, and I needed it to be a place that felt "me". So now it looks like this:

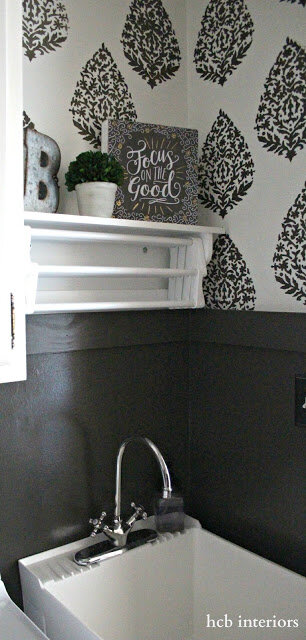
We painted the walls, stenciled, and installed beadboard. We also installed new hooks, cabinet pulls, an accordion-style drying rack, and a wall-mount utility tub. This last one was important because the legs of the old sink pushed the dog's bowls out into the doorway - now we can actually close the door. Hooray! We scrapped the idea of shelving over the drying rack & washer/dryer. I may go back and add that in later, but I wanted to get a feel for the use of the space before adding more clutter into this small room.

This space is so tight that we had to forgo the beadboard on the back wall. That tiny difference in depth was enough to cause the new sink to stick out into the doorway. So, we painted the drywall to match the beadboard, and kept the top trim piece to provide continuity. I'm pretty excited that this new drying rack won't smack me in the head each time I use the sink, unlike the previous rack that was way too big for the space.

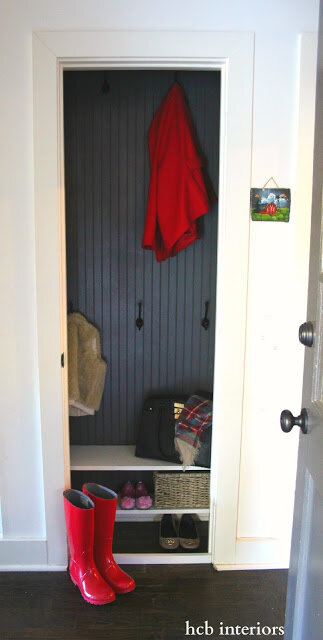
Up next is our "mudcloset". This space is only 36" wide by 10" deep. So not even a full foot of storage space depth. Argh. But, it is better than the option of walking across the house every time you need shoes or a jacket. I had planned on stenciling the walls of the mudcloset to match those in the laundry room. But hours of hard work ending in imperfections and frustration convinced me that easy-to-install beadboard might be a better choice, and it is definitely more durable against wet jackets and muddy shoes. We also removed the inefficient top shelf, added more shelving/shoe storage at the bottom, and raised all the hooks so that our jackets weren't completely covering those of our girls.
Now on to the office nook. This was a random idea I threw in at the last minute, after we had already decided to tackle the other areas. Luckily, hubby was game to try his hand at building a floating desk, and I am SO proud and impressed by his talent. Time and space constraints prevented us from building the cubby system I had originally designed, but I think this one is a suitable replacement. I love the character the World Market sconce adds to the space, but the best part is my babies watching over me from the chalkboard wall. I adore looking at those precious faces while I'm working.

And finally, a before and after of the whole space.
 After painting the slivers of wall next to the garage door white, we decided it was a little boring. A last minute decision (as in this past weekend) was made to continue the beadboard and trim out here, and I'm so glad we did. I think it really is the key to providing continuity between all the spaces.
Thanks for joining us on this journey. It was definitely worth it, and we will absolutely do it again (although I am so thankful that the next one is not any time soon. This mama needs some sleep!). Having time/budget/space limits required us to get a little creative in certain areas, and it also forced me to accept imperfections and constraints that would have frustrated me otherwise. Most importantly, my husband and I enjoyed working as a team, and this project cemented our love for DIY (although I'm a bigger fan of the idea part of DIY. I'm lucky the other half of my team likes the actual DIY). ;)
A big thanks to Linda for creating and hosting the One Room Challenge. My next post (hopefully early next week) will include sources for all the spaces. Until then, go check out the other 175+ guest participants! :)
For those dropping in for the first time, we committed to making over our laundry room, mudcloset, & garage entry, and we turned a pantry into an office nook in the kitchen hallway. You can see our intro here, design plan here, and play catch up here, here, and here. Linda of Calling It Home created this wonderful blog program, a 6 week exercise in design (& a little insanity). It was so fun, and we've already come up with ideas for at least 3 other rooms. I'm not sure we will participate in 3 more ORCs consecutively as budget does play a huge factor in timeliness. But, I am sure we will do this again, and hopefully soon. Ok, enough talking. On with the pictures.
As a reminder, here is a before shot of the laundry room.
It wasn't bad; in fact, most people who visit our home comment on how much they loved the laundry room walls. But, it just wasn't for me. I spend a lot of my day in the kitchen, which has a direct view of the laundry room, and I needed it to be a place that felt "me". So now it looks like this:
We painted the walls, stenciled, and installed beadboard. We also installed new hooks, cabinet pulls, an accordion-style drying rack, and a wall-mount utility tub. This last one was important because the legs of the old sink pushed the dog's bowls out into the doorway - now we can actually close the door. Hooray! We scrapped the idea of shelving over the drying rack & washer/dryer. I may go back and add that in later, but I wanted to get a feel for the use of the space before adding more clutter into this small room.
This space is so tight that we had to forgo the beadboard on the back wall. That tiny difference in depth was enough to cause the new sink to stick out into the doorway. So, we painted the drywall to match the beadboard, and kept the top trim piece to provide continuity. I'm pretty excited that this new drying rack won't smack me in the head each time I use the sink, unlike the previous rack that was way too big for the space.
Up next is our "mudcloset". This space is only 36" wide by 10" deep. So not even a full foot of storage space depth. Argh. But, it is better than the option of walking across the house every time you need shoes or a jacket. I had planned on stenciling the walls of the mudcloset to match those in the laundry room. But hours of hard work ending in imperfections and frustration convinced me that easy-to-install beadboard might be a better choice, and it is definitely more durable against wet jackets and muddy shoes. We also removed the inefficient top shelf, added more shelving/shoe storage at the bottom, and raised all the hooks so that our jackets weren't completely covering those of our girls.
 |
| The almost imperceptible marks on the sliver of wall to the right are my babies' growth charts. We will never be able to paint this section ;) |
Now on to the office nook. This was a random idea I threw in at the last minute, after we had already decided to tackle the other areas. Luckily, hubby was game to try his hand at building a floating desk, and I am SO proud and impressed by his talent. Time and space constraints prevented us from building the cubby system I had originally designed, but I think this one is a suitable replacement. I love the character the World Market sconce adds to the space, but the best part is my babies watching over me from the chalkboard wall. I adore looking at those precious faces while I'm working.
And finally, a before and after of the whole space.
Thanks for joining us on this journey. It was definitely worth it, and we will absolutely do it again (although I am so thankful that the next one is not any time soon. This mama needs some sleep!). Having time/budget/space limits required us to get a little creative in certain areas, and it also forced me to accept imperfections and constraints that would have frustrated me otherwise. Most importantly, my husband and I enjoyed working as a team, and this project cemented our love for DIY (although I'm a bigger fan of the idea part of DIY. I'm lucky the other half of my team likes the actual DIY). ;)
A big thanks to Linda for creating and hosting the One Room Challenge. My next post (hopefully early next week) will include sources for all the spaces. Until then, go check out the other 175+ guest participants! :)
ORC Week 5: Denial is One of the Stages
First off, please excuse the look of my blog - I am in the middle of updating it but it's not quite finished. Second, how is this the last full week of the ORC?!? For those of you just joining in, the One Room Challenge (ORC) is a blog program in which almost 200 bloggers, designers, etc. commit to changing up a room in 6 short weeks. I have learned that pacing yourself is EXTREMELY important - at the beginning, it seemed like we had so much time, and now that we are down to the wire, I would say we are still just barely over half done with our projects. Eeek!!!
My sweet, supportive husband (aka contractor/handyman/electrician/plumber) has been working his tail off this week. In the past few days, he has installed the beadboard & trim in the laundry room, framed out the desk area, put in a new sink, and installed more lighting. I know I am going to owe him big time after this. And don't even think about telling him that I've already got plans for the Spring 2016 ORC up my sleeve ;)

Speaking of lighting, that has been our challenge this week. I think I've mentioned before that the lighting in our oldish home is quirky at best & downright dangerous in some areas. Luckily, I have a a great team of electricians on speed dial, & they have benefited from dozens of hours and thousands of dollars as we bring our home up to code. Our biggest snafu this week was when the junction box in the laundry room shattered into a dozen pieces while my husband was putting in the last screw of our new light. And while hubby is a super handy guy, installing a new junction box was something he didn't feel comfortable doing. So we had a last minute visit from the electrician today, and after he took a look at it, we were very glad we called in the professionals. It might have set us back in both time & money, but at least now we don't have to worry that old wiring will cause a fire.
I really liked the old schoolhouse light we had in here (see above photo for reference), but when I realized the laundry room light was directly behind the new glass & brass light we hung in the hallway, I knew we needed a more similar light for a cohesive look. HomeGoods did not have a second of my hallway light, so I found this one from Home Depot. It's actually huge (I thought it was a small pendant at purchase), but I think it works. Unfortunately, all that electrical work left a huge hole in the ceiling, and there's no time to fix it, so instead we slapped a coat of Urbane Bronze on an old ceiling medallion & it covered the hole perfectly. It wouldn't have been my first choice as the light fixture is simple, & the medallion is a bit much size-wise, but when you're in a time crunch, sometimes you just have to go with it.
I also scrambled to find new lighting for the office nook after realizing the picture light I had purchased previously was too formal for the space. Luckily, we snagged the last 2 of the sconces I found at my local World Market, & I also ordered these beauties from Lowe's. I think I will be going with the World Market sconces, but may have to find a different place in my home for the Allen & Roth sconces - they're just too great to give up! ;)

We still have yet to start on the mudcloset, and the desk & entry are only about 10% complete.. Yikes. It's time to up the coffee intake.
Let's look at our to-do list, shall we? Or maybe we shouldn't. Sometimes denial is a beautiful coping mechanism.
Install beadboard & molding // Paint & stencil walls (Praise the Lord I can cross this off) // Install hooks on molding // New utility sink // Pulls for cabinets // New lighting ? // Replace drying rack // Install shelf above washer & dryer // Install shelves above drying rack
Paint walls // New rug // New lighting // Install beadboard (added to the list this week)
Chalkboard or pinboard // Lighting (purchased but not yet hung)
My sweet, supportive husband (aka contractor/handyman/electrician/plumber) has been working his tail off this week. In the past few days, he has installed the beadboard & trim in the laundry room, framed out the desk area, put in a new sink, and installed more lighting. I know I am going to owe him big time after this. And don't even think about telling him that I've already got plans for the Spring 2016 ORC up my sleeve ;)
 |
| Finding a wall-mount utility tub with the faucet on the sink instead of mounted to the wall was a challenge. See all the open floor space? Now the dog's bowls can go under the sink instead of in the doorway. Hooray for small victories! :) |
I really liked the old schoolhouse light we had in here (see above photo for reference), but when I realized the laundry room light was directly behind the new glass & brass light we hung in the hallway, I knew we needed a more similar light for a cohesive look. HomeGoods did not have a second of my hallway light, so I found this one from Home Depot. It's actually huge (I thought it was a small pendant at purchase), but I think it works. Unfortunately, all that electrical work left a huge hole in the ceiling, and there's no time to fix it, so instead we slapped a coat of Urbane Bronze on an old ceiling medallion & it covered the hole perfectly. It wouldn't have been my first choice as the light fixture is simple, & the medallion is a bit much size-wise, but when you're in a time crunch, sometimes you just have to go with it.
 |
| Excuse the poor quality. This room is so hard to get a photo of, as there are no windows nearby. |
We still have yet to start on the mudcloset, and the desk & entry are only about 10% complete.. Yikes. It's time to up the coffee intake.
Let's look at our to-do list, shall we? Or maybe we shouldn't. Sometimes denial is a beautiful coping mechanism.
Laundry:
Entry:
Mudcloset:
Repaint // Lower top hooks so shelf is more accessible // Add shoe storage // Add more hooks
Office nook:
Floating desk // Install outlet // New printer // Cubby holes/storage for mail, office supplies
ORC Week 4: Never Stenciling Again
Y'all....
From now on, if I ever mention stenciling, just remind me to start saving pennies for the wallpapers of my dreams. Schumacher, Phillip Jeffries, Quadrille - I should not have abandoned you. ;)
In all seriousness, stenciling is not for the faint of heart, and definitely not for Type A personalities. I'm more of an A-/B+ type myself, but the misalignments and random paint smears just about sent me over the edge. As there was no wine in the house to ease my pain, I helped myself to the Halloween candy stash. We might need to re-stock. Oops.
Part of the issue with the stencil is my fault. The design I chose came with a dot in between each damask. But I did not want the dot as I was going for more of a block print look, so I taped over the dots to ensure that they would not get stenciled on the walls. I realized after my 3rd unevenly spaced attempt that the dots also help to line up the stencil. Once I figured that out, I just eyeballed where the dots should be & measured (again by eyeballing it) from there. The lack of actual measuring is the Type B+ personality I mentioned earlier. ;)
Stenciling the corners is where the real mashing of teeth began. I may have to redo that section to cover up the awful smearing & paint globs. It was not quite as easy as the pros make it look. And I learned that it was best if I waited about 5 minutes in between each stencil to allow for some drying, even though the instructions say you can move on immediately. But we persevered, and I am very happy with the overall result. It is beginning to look like what I pictured in my head (minus all the mistakes), & it's really fun.
In other parts of the reno, the hubs decided that he would not have time to custom build cubbies over the desk. I totally understand, but man, it would have looked so good. Luckily, the day after he told me it was a no-go, I happened upon multiple options while at Target, and after squishing my children to the side, managed to load 4 of them in my buggy. This beauty is the winner in both form & function.
It changes the influence of my design a tad - it's a little more rustic/industrial than my original idea, but luckily I have some other galvanized pieces I can pull from around the house to make it work. It does mean that we have to return the lighting I purchased for the space; the picture light is formal & traditional, and the desk area is now leaning towards industrial farmhouse, so it's back to the search I go. In a moment of insanity while feeling sorry for me, hubby offered to create some custom lighting if I can't find anything in my increasingly dwindling budget, so that's my fallback plan. Sounds foolproof, right?
Finally, I finished the chalkboard wall in the office nook with Martha Stewart Crafts Multi-Surface Chalkboard Acrylic Craft Finish in Chalkboard Clear. I used the entire bottle to apply 4 coats, with a few hours of dry time in between each coat. I waited a full 24 hours after the last coat, and then seasoned the entire wall with a couple pieces of chalk. It seems to be working great, but I will let you know if that changes over time. At 1 am last night, my sweet husband decided to start framing out the desk to try to get ahead of the lack of work we are predicting will happen over Halloween weekend. Trick or Treating comes first. #priorities
Oh, and the mudcloset hasn't even been touched yet. Yikes.
In case lists are your thing (they rank high on my...list... of favorite things. See what I did there?), let's check in on our progress.
Paint walls // New rug // New lighting
Chalkboard or pinboard // Lighting
From now on, if I ever mention stenciling, just remind me to start saving pennies for the wallpapers of my dreams. Schumacher, Phillip Jeffries, Quadrille - I should not have abandoned you. ;)
In all seriousness, stenciling is not for the faint of heart, and definitely not for Type A personalities. I'm more of an A-/B+ type myself, but the misalignments and random paint smears just about sent me over the edge. As there was no wine in the house to ease my pain, I helped myself to the Halloween candy stash. We might need to re-stock. Oops.
Part of the issue with the stencil is my fault. The design I chose came with a dot in between each damask. But I did not want the dot as I was going for more of a block print look, so I taped over the dots to ensure that they would not get stenciled on the walls. I realized after my 3rd unevenly spaced attempt that the dots also help to line up the stencil. Once I figured that out, I just eyeballed where the dots should be & measured (again by eyeballing it) from there. The lack of actual measuring is the Type B+ personality I mentioned earlier. ;)
Stenciling the corners is where the real mashing of teeth began. I may have to redo that section to cover up the awful smearing & paint globs. It was not quite as easy as the pros make it look. And I learned that it was best if I waited about 5 minutes in between each stencil to allow for some drying, even though the instructions say you can move on immediately. But we persevered, and I am very happy with the overall result. It is beginning to look like what I pictured in my head (minus all the mistakes), & it's really fun.
 |
| Only 1 damask stencil left to go. And a glimpse of the new pulls that I LOVE. Ignore the unpainted bottom right corner; that will be covered with beadboard :) |
In other parts of the reno, the hubs decided that he would not have time to custom build cubbies over the desk. I totally understand, but man, it would have looked so good. Luckily, the day after he told me it was a no-go, I happened upon multiple options while at Target, and after squishing my children to the side, managed to load 4 of them in my buggy. This beauty is the winner in both form & function.
 |
| Notice anything funky about #8? It makes me laugh each time I see it upside down. All the ones in the store were the same. Might have to keep it for the quirkiness. |
It changes the influence of my design a tad - it's a little more rustic/industrial than my original idea, but luckily I have some other galvanized pieces I can pull from around the house to make it work. It does mean that we have to return the lighting I purchased for the space; the picture light is formal & traditional, and the desk area is now leaning towards industrial farmhouse, so it's back to the search I go. In a moment of insanity while feeling sorry for me, hubby offered to create some custom lighting if I can't find anything in my increasingly dwindling budget, so that's my fallback plan. Sounds foolproof, right?
 |
| Despite the lighting issue in the office nook, I am in LOVE with my fun find at HomeGoods of all places! Still needs a cool lightbulb after hubby broke the other one. And in the background is a glimpse of the partially painted entry wall (was Stratton Blue, now is White Dove. Or at least most of it is) |
 |
| Please excuse the lighting in all of these. It's been raining for days in GA, & my camera has a temper tantrum each time I try to take shots without a flash. You can see the chalkiness of the chalkboard paint on the upper part of the wall. |
Oh, and the mudcloset hasn't even been touched yet. Yikes.
In case lists are your thing (they rank high on my...list... of favorite things. See what I did there?), let's check in on our progress.
Laundry:
Install beadboard & molding // Paint & stencil walls (Praise the Lord I can cross this off) // Install hooks on molding // New utility sink // Pulls for cabinets // New lighting ? // Replace drying rack // Install shelf above washer & dryer // Install shelves above drying rack
Entry:
Mudcloset:
Repaint // Lower top hooks so shelf is more accessible // Add shoe storage // Add more hooks
Office nook:
Floating desk // Install outlet // New printer // Cubby holes/storage for mail, office supplies
If you just now catching up, you can see Week 1, Week 2, & Week 3 here. And don't forget to visit Linda at Calling It Home to check in on the almost 200 other participants.
Happy Halloween y'all!
ORC Week 3: Progress??
Well, we're halfway through, and I cannot confidently say that we're halfway done with our work. Ahh!! We've had a few setbacks, most notably time. The baby had croup, and the hubby was out of town all weekend, so we are trying to make up for it by working late after the kiddos are in bed. Coffee & I have always been BFFs, but now we are thisclose.
That being said, it's still pathetic how much we've gotten done compared to our normal project timelines. Guess those Netflix marathons really do cut into productivity.
We painted the office nook Sherwin Williams Urbane Bronze, & I love love love the dark against all the white in our home. I've used this color before, mainly on our exterior doors, but I've never used it on walls. Looks so good. After a couple coats of the UB, I started coating a portion of the back wall with Martha's Multi-Surface Chalkboard Acrylic Craft Finish. It has given the wall a slightly chalky/glazed sheen, but still looks fine. I think the fact that the wall has so many imperfections and is in a dimly lit space helps; not sure how it would look in a sunlit area.
I started on the stencil work in the laundry room, and I am in love with the design. I've never stenciled before, so the results have been imperfect, but I actually kind of like it better that way. Hopefully, I'll finish it tomorrow so that we can start installing beadboard this weekend.
Luckily, our only snafus so far have been minor. I scored a great deal at HomeGoods, & found a light that is a little out of my comfort zone (which is laughable because it's so tame, but my style is farmhouse/cottage/classic & this light is a teensy bit industrial). I think it will really make the space though, and add a little zing. However, when I was removing all the stickers the manufacturer plastered it with, some of the finish came off. And then the awesome vintage lightbulb I paid extra for popped in half when my husband (who would like acknowledgement for his obvious brute strength) pulled it out of the box. But if those are our only issues, I will gladly take them!

There is still so much left to do, most notably installing paneling, building a free floating desk, and installing a new sink. Check back next week to see how much more we've done, or if we've gone off the deep end. Right now, it's a toss-up. ;)
Follow me on Instagram at hcbinteriors for more frequent updates. And don't forget to check out the other participants - the talent is incredible!
That being said, it's still pathetic how much we've gotten done compared to our normal project timelines. Guess those Netflix marathons really do cut into productivity.
We painted the office nook Sherwin Williams Urbane Bronze, & I love love love the dark against all the white in our home. I've used this color before, mainly on our exterior doors, but I've never used it on walls. Looks so good. After a couple coats of the UB, I started coating a portion of the back wall with Martha's Multi-Surface Chalkboard Acrylic Craft Finish. It has given the wall a slightly chalky/glazed sheen, but still looks fine. I think the fact that the wall has so many imperfections and is in a dimly lit space helps; not sure how it would look in a sunlit area.
I started on the stencil work in the laundry room, and I am in love with the design. I've never stenciled before, so the results have been imperfect, but I actually kind of like it better that way. Hopefully, I'll finish it tomorrow so that we can start installing beadboard this weekend.
 |
| A little hint at the stencil work |
Luckily, our only snafus so far have been minor. I scored a great deal at HomeGoods, & found a light that is a little out of my comfort zone (which is laughable because it's so tame, but my style is farmhouse/cottage/classic & this light is a teensy bit industrial). I think it will really make the space though, and add a little zing. However, when I was removing all the stickers the manufacturer plastered it with, some of the finish came off. And then the awesome vintage lightbulb I paid extra for popped in half when my husband (who would like acknowledgement for his obvious brute strength) pulled it out of the box. But if those are our only issues, I will gladly take them!
There is still so much left to do, most notably installing paneling, building a free floating desk, and installing a new sink. Check back next week to see how much more we've done, or if we've gone off the deep end. Right now, it's a toss-up. ;)
Follow me on Instagram at hcbinteriors for more frequent updates. And don't forget to check out the other participants - the talent is incredible!
ORC Week 2: Demo & Design Plan
Not surprisingly, the laundry room & to-be office nook look huge now that they're empty of junk. But they're actually fairly small: the laundry room is 35 sq. ft. & the office nook is only 4 ft wide & 18 inches deep. This means less area to work on, but it also means we have to be efficient with our space planning. I love the challenge of ensuring a design works as good as it looks, so this is one of the things I'm most eager to get to (& also what is keeping me awake at night). ;)
 |
| Removed all the junk & shelves, patched the holes, and now we are ready to paint! |

Below is my design board. It's a little different from the ones I send to clients; this is more of an inspiration board than a true design board. I'm taking elements from all of the images & giving them my own spin. So, what you see here will not exactly be what you'll see in the end, as opposed to a detailed design that I provide for my clients. But, it will keep me focused on not straying too far outside my ideas, something that can happen when I'm browsing my favorite antiques store, or let's be honest, each time I step inside Target or HomeGoods.
 |
| Clockwise from top left: Melinda Hartwright // Sherwin Williams Urbane Bronze // Schoolhouse Electric Benjamin Moore White Dove // An Urban Cottage // Ladies Home Journal // This Old House // Boston Globe Magazine |
And finally, our to-do list. Phew! Seeing how many things there are still to be done is a little overwhelming. This is definitely going to be a 'take it one step at a time' process.
Laundry:
Install beadboard & molding // Paint & stencil walls // Install hooks on molding // New utility sink //
Entry:
Paint walls // New rug // New lighting
Mudcloset:
Repaint // Lower top hooks so shelf is more accessible // Add shoe storage // Add more hooks
Office nook:
Floating desk //
Chalkboard or pinboard // Lighting
Please check in on our progress again next week! Y'all are keeping me accountable ;)
And remember, there are nearly 200 other bloggers joining in on the fun, so go give them some love!
One Room Challenge Fall 2015
Twice a year, I look forward to reading about those participating in Linda’s (Calling it Home) One Room Challenge (ORC), a blogger challenge to complete one room in your home in 6 short weeks. This year, I have convinced my husband that
we need to participate! It’s not really
the best time for us to dive into a fast-paced, money-draining project, but is
there ever really such a thing as a perfect time?
Our home is a cozy (aka smallish) '70s ranch. We are lucky to be on a full basement, but the main level specifically must be truly functional since it is where we spend most of our time, and there's just no space to waste. Besides, I truly believe in actually living in all of a home's rooms - no "look, but don't touch" spaces for this girl. This does mean we have to get creative sometimes, and our makeover space fits the bill on needing lots of work & out-of-the-box thinking.
For our first ORC, we will be revamping the hallway/laundry/mudroom/pantry space just inside of our garage door. It’s an awkward layout. Entering from the
garage, you are in a narrow hallway that is part of the kitchen. There are 5 doorways in this tiny space. The laundry room, pantries, “mudcloset”, and
garage door are visible from all parts of the kitchen. The dining room, front
door, & foyer are all visible from the garage door. And the garage door & one of the pantries
are visible from the front door. This
requires a cohesive look that will work with all adjacent spaces, so that your
line of sight is not jarred by incongruent design. It also requires
organization & tidiness, habits on which our entire family are still
perfecting. ;)

Our kitchen is long, narrow, & had 3 pantries when we
moved in, none of which were that close to each other. I realize this may sound wonderful to those
who have no pantry space (it did to me too, before we actually started living
in the space). But it quickly became apparent that we needed a place to hang
our coats & kick off our shoes, not 3 different places to store our
cereal. So, my sweet hubby did a quick
weekend revamp last year, & turned the pantry directly across from the garage door (pantry #2) into a “mudcloset’. Since it is not even
12” deep, I think calling it a mudroom would be a tad overzealous. This area will get a small update.

Our laundry room is at the end of our long kitchen, opposite
the breakfast nook. I am, of course,
constantly in there doing laundry, and the dog’s bowls are in there as well, so
the door is always open. I personally do
not love looking at my piles of dirty laundry while I’m eating, so making this
space more functional, and definitely more appealing to look at, is at the top
of my list. An added bonus is that if I can close the door, the baby will no longer play in the dog's food bowls.
It is a very narrow room, with barely enough space to squeeze in a laundry basket. It's also a catchall for anything that doesn't have a home, so the space gets even narrower with all the junk piled up. Please pretend you aren't appalled by our mess. This is it on a good day. :)

Finally, the space
that I’m most excited about redoing is the 3rd pantry (for those of
you keeping count, pantry #1, a tall set of cabinets close to the kitchen sink, is
staying a pantry). #3 is the biggest
of the pantries, and while we use it everyday for storage, it will be turned
into something we will use even more – an office nook. There is no spot on the main level of our
home for an office. My desk has moved
from the basement (sharing a space in the playroom or my husband’s office
wasn’t practical or feasible) to the family room to the dining room. We had high hopes for a dining
room/library/office combo, but the office part just never felt right. I didn’t love that all of my work stuff,
bills, etc. would be piled high on my desk while we were trying to entertain,
or that my computer screen was the first thing you saw when coming in the front
door as the dining room is directly off the foyer. I will have to keep this small space organized
as it is still partially visible from the front door/dining room, but it’s not
as in your face as when it was in the dining room. And, I have to find a new home for all of the junk we currently have crammed into the pantry. Time to edit!

Overall, I am ecstatic to join in on this fun process –
let’s hope we still think it’s fun in 6 weeks!
Check back every Thursday for updates; next week I'll share my design plan and the start of the deconstruction process. And if you want to be a linking participant like me, check out Linda's blog for details!